Showing posts with label Eyeshadow. Show all posts

Monday, 16 March 2015

Hyped: The Maybelline Champions

You might be sick of reading about these two.  I won't lie, I am too and often skip on by the reviews of the On and On Bronze Color Tattoos and the Eraser Eye Concealer because how many times can you read the same thing over and over again.  I avoided the hype particularly on the Color Tattoo's for what must have been years and here I am...I've finally given in.

Maybelline On and On Bronze Color Tattoo Eraser Eye Concealer Review

So let's start with On and On Bronze as this was the one I was definitely most excited to try.  The majority of my eyeshadow collection are powder.  In fact, this is one of only two cream eyeshadow to grace my stash.  The shade itself is great; easy wearing, perfect for wearing every day, it adds a subtle gleam to the lids which I think can be easily built up to pack a real bronze if you fancied for the evening.  It's pretty much been a go to for me in all honesty!  The Color Tattoos leave a beautiful sheen to the eyes which I think can only look nicer as it gets into the warmer months - think a more wearable, every day version of the MAC Eye Glosses.  This all said...I don't think I'll be picking up any more shades because my heart has already been stolen by the Jouer Long Wear Creme Eyeshadow as mentioned in my January Favourites.  The Maybelline texture feels almost like Vaseline compared to the mousse like cream shadows from Jouer, and whilst the Maybelline Color Tattoos are long wearing, the Jouer version beats it and dries to a nice powder finish.

Maybelline On and On Bronze Swatch Review

The Maybelline Eraser Concealer...damn it took me a long time to get hold of this one because it was constantly sold out.  I went for the shade Light, and I actually really do quite like it.  It really brightens under my eyes and conceals dark circles nicely.  I wouldn't say it's a completely flawless concealer - it's definitely a natural looking concealer and isn't completely opaque but I quite like that, even for covering blemishes because it just gives a natural finish.  I love wearing this on the weekends without foundation too - it brightens my entire complexion and just makes everything seem a bit nicer.  

I also don't see why everyone is moaning about the fuzzy applicator tip being unhygienic - if anything, it's more hygienic than doe foot applicators, because you're not dipping the wand back into the product and contaminating it.  It's no different to any other concealer unless you're telling me you honestly wash your wand.  It looks grubby because it's not white like when you bought it and the tip can touch the inside of the cap, but I think that it applies really nicely so no complaints here from me.  I have found though that this settles pretty much on application into fine lines around my eyes.  I'll often apply it, set it, finish the rest of my make up and have to go back and buff the creases out with a setting brush before leaving the house and then I'm good for most of the day.  I think I'd buy this again, but I might try out a few other concealers before committing to this one...

Have you given into the hype too?  What are your thoughts?

Monday, 26 January 2015

Face Facts: Orange Pop

It's been quite a while since I've written one of these Face Facts posts!  I hate taking photographs of myself.  If you didn't know/couldn't tell, all of my blog photography is done on my phone.  I don't have a super fancy camera and I don't have fancy lighting so something I find quite hard is taking a quality photograph of myself.  All of this said, I really enjoy doing these types of posts and maybe in the future when I maybe have invested in some kit, I can look back on these and compare my old style to the new!

Onto the look...I'm fed up of being cold now, I'm just not a fan of Winter and can't stand being freezing all the time.  I decided I was going to hop into Spring a bit early this year - I've started to dismiss my darker lips in favour of bolder and brighter ones and the look I've been reaching for a bit quite lately is this one!


FACE FACTS
Rimmel Fix and Perfect Pro Primer in 002
Rimmel Match Perfection Foundation in Ivory
Maybelline Instant Anti-Age The Eraser Eye Concealer in Light
Rimmel Stay Matte Pressed Powder in Translucent
Illamasqua Cream Pigment in Delirium
Naked Palette - Buck
NARS Eye Paint in Black Valley
Rimmel Scandaleyes Retro Glam Mascara in Black
Barry M Brow Kit
NARS Velvet Matte Lip Pencil in Iberico

Real Techniques Buffing Brush
Real Techniques Setting Brush
Eco Tools Complexion Blending Brush
Eco Tools Full Powder Brush
Naked 3 Palette Dual Ended Eyeshadow Brush

Topshop Nails in Concrete


I started by prepping my skin with the Rimmel Fix and Perfect Pro Primer in 002.  I won this on a giveaway before Christmas (it and some other goodies look a total state because a nail varnish smashed during transit!) and haven't really used it too often.  It's really nice actually; velvety rather than feeling like your skin is coated in silicone so I'll start making an effort to use this more.  For foundation, I have been using my Rimmel Match Perfection Foundation in the shade Ivory.  This is actually my second bottle and it's currently my every day foundation - really illuminating with a medium coverage.  I concealed my under my eyes with the ever hyped Maybelline Anti-Age concealer and I like it, but I'm not sure if I love it just yet.  I only got it the other week, and I'm pretty hard to please concealer wise.  I set that with the Rimmel Stay Matte Powder.

I contoured my cheeks with the Illamasqua Cream Pigment in Delirium and ohhhhmahgod...I love it so much.  I only got it last week, but I've used it every single day since I bought it.  It creates the most perfect shadow that looks really natural.  I then blended that up lightly to give a hint of colour to my cheeks but nothing to dramatic because I wanted quite a simple look.  I used the shade Buck from the Naked palette to quickly add some depth to my eyes by applying that into my crease, and lined with the NARS Eye Paint in Black Valley.  For mascara, I chose the Rimmel Scandaleyes Retro Glam Mascara.  I hated this when I first got it because the formula was so wet and application was always so messy, but it's okay now - I don't think I'd buy it again though when it runs out.

For my brows, I once again used my Barry M Brow Kit.  I use this every day, but again I don't think I'd buy this again.  It's pretty warm toned and I just feel that there must be something better out there to try.  I have a review of this coming this week so keep an eye out for that!  And for the main part of the look, I used NARS Iberico on my lips.  This was a lip pencil that came in the Digital World Lip Pencil Coffret and is currently my most used shade!  It's a warm toned orange red which is really in your face - I love it and don't own anything like it already!

What's your current go-to make up?

Thursday, 15 January 2015

Deborah Milano 24 Ore Velvet Eyeshadow

The Deborah Milano 24 Ore Velvet Eyeshadows...where to begin with these two.  I was asked forever and a month a go now if I'd like to try these out, and having never tried anything from Deborah Milano, I was so excited to try them!  Described as fade resistant, velvety soft and a high coverage with an easy to blend formula, I was sold!  They can be applied wet or dry, and my mind instantly wandered to a potential dupe for the NARS Dual Intensity Eyeshadows which granted I've not tried yet, but was really hoping to find something with a similar intensity that I've seen on other blogs.

I opted for the shades 07 Dark Chocolate* and 08 Taupe* as these were both shades that I thought I could get plenty of wear from resulting in a fair and honest review.  Well...I've had more than enough time to reach for these and the verdict isn't a great one.

Deborah Milano 24 Ore Velvet Eyeshadow Swatch Review

My first twinges of disappointment came in when I was taking the product photographs and attempting to get some swatches.  I found that the shades really were lacking in any intensity and required a lot of building to get a good colour. Dark Chocolate (top swatch) is a warm brown which a slight satin finish and the Taupe shade (bottom swatch) I think leans slightly more bronzed, and has a fine shimmer to it which I really liked.  I wore the Taupe shade the most, and wore it almost daily for work to get a fair test.  Application was easiest using my ring finger to quickly wash the colour across my lids which I then blended out with a fluffy brush.  The colour has to be built up though - as I said, the pigmentation in these shadows aren't the best.  I usually opted for two to three layers to get a decent colour pay off on my lids, which was the same with the swatches on my wrist.

Deborah Milano 24 Ore Velvet Eyeshadow Swatch Review

I also tried these shadows wet (first swatch Dark Chocolate wet, second dry.  Third swatch Taupe wet, fourth dry) and where usually you can expect a higher pigmentation, applying these wet just watered the pigment down, and made application of any colour near impossible - you can see in the pan how much surface area I had to really go for to get this swatch.

Deborah Milano 24 Ore Velvet Eyeshadow Swatch Review

The wear time was pretty disappointing too...it was just two hours before my eyeshadow was creased.  Not even slightly creased, really creased and quite patchy.  The wear time was slightly better using a primer like the Urban Decay Primer Potion, but only an extra hour or so.  It was easy to blend the creases out with my finger again, but the pigmentation just wouldn't stick around.  If you don't use a primer, spraying your eyeshadow brush with the Urban Decay Setting Spray also helped a tiny bit with the longevity of these eyeshadows.

The packaging for these is very basic, but it does the job just fine.  A light plastic casing, with a transparent flip and click lid houses the product.  You can see clearly which shades are which, and it comes with a sponge applicator which, in all honesty, I knew I wouldn't be using.  These shadows come in at £5.50 each, and I do think there are nicer packaging options on the high street at a similar or cheaper price.

I feel a bit bad writing so much negativity (who knew I'd have so much to say about two eyeshadows) but I just feel a bit let down by them.  I'd never tried anything from Deborah Milano before, and these weren't a great start for me.  The shades really do look lovely and the texture was velvety as promised, but the colours just don't translate effortlessly onto the skin for me!  Honestly, the most effective use I got out of these eyeshadows was actually on Halloween - I used the Dark Chocolate shade heavily as a contour across my cheekbones, around my eyes on on my temples...if you didn't see that on my Instagram, you can see that in full effect here!

Have you tried anything from Deborah Milano?  Any application tips that might make these work for me?
*The Deborah Milano 24 Ore Velvet Eyeshadows were sent to me for consideration.

Tuesday, 29 July 2014

Face Facts: Basic Bronze

And it's back to reality...  I got back from Spain on Saturday after a week of sun and playing in the pool and it's safe to say...England is freakin' hot.  I am as boiling here as I was there, except here it's worse because I don't have air-con or a pool to cool off in!

I kept my make up very minimal on holiday - most days I wore absolutely nothing except an SPF during the day.  We only went out a couple of nights, and my look was very basic, but one that I thought enhanced the sun tan freckles that I had going on...

Face Facts FOTD Summer Evening Make Up Tutorial

FACE FACTS
Soap and Glory Glow Job
Benefit Porefessional Primer
Rimmel Brow Pencil in Dark Brown
The Body Shop Shimmer Waves in Bronze
The Body Shop Carbon Eye Definer in Brown
Bourjois Liner Feutre in Gold Shine
Bourjois 3D Effect Lipgloss in Or Feeric

Real Techniques Contour Brush
Real Techniques Setting Brush

Barry M Gelly Polish in Passionfruit

To start, I applied Soap and Glory Glow Job.  I absolutely love this, and have had this around a year now, so I think it needs to go soon, but it's so nice!  It's a chocolate orange scented moisturiser with bronze beads inside, so when you rub it in, it blends out into a nice sun kissed glow.  The only downside, it comes across mighty shiny on my already oily skin, so I covered with a quick slick of Benefit's Porefessional.  It smoothed over my skin, and also matted down the Glow Job.

I contoured and coloured with the Bourjois Bronzing Powder & Highlighting Duo and the cream blush in Pink Sunwear.  These work really nicely together, and added natural definition and colour to my cheeks.  I used The Body Shop Shimmer Waves for my eyes, taking the individual shades from the waves to add some colour to my eyelids, followed by a smokey slick of the Carbon Eye Definer, and some golden highlights along my lower lash line and top inner corner with the Liner Feutre.  I finished my eyes with the Maxfactor False Lash mascara, and topped the entire look off with a lipgloss - I'm not normally a fan of lipgloss, but I wanted something subtle, yet enhancing for my lips!

And there we have it!  My evening make up for a Summer's night in Spain!

Tuesday, 15 April 2014

Beauty Comparison: A MAC Sumptuous Olive Dupe?

A few weeks ago now, I won a MAC eyeshadow on Katie's blog Sugarfixx Beauty.  I chose the shade Sumptuous Olive, as it is one I hadn't heard much about, but had once seen on a Youtube video and fell in love with the shade.  It wasn't until I had chosen it as my prize that I started to panic after seeing comparisons to Sumptuous Olive and a shade from the Wet n Wild Comfort Zone palette, which I already had...

MAC Sumptuous Olive Dupe

I wanted my first MAC eyeshadow to be a shade that I didn't already own, so naturally I felt a little disheartened that I had unwittingly chosen something I supposedly already had.  Last week, my prize arrived with the postman and I was relieved to find that Sumptuous Olive is definitely not a dupe for the shade from the Comfort Zone palette.

MAC Sumptuous Olive Dupe

Right...finger swatching, they do look pretty similar, I'll give you all that.  On the left we have MAC's Sumptuous Olive, and on the right is the eyelid shade from the right side of the Comfort Zone palette.  You can see though that MAC has a brown undertone to it, with a gold shimmer running through it - sort of an antique bronze?  Whereas the Wet n Wild shade definitely has a lot more green in it.

MAC Sumptuous Olive Dupe

The real difference is when the shade is blended out a bit.  Believe it or not, the shade on the top of my wrist is the MAC Sumptuous Olive.  The shades are completely different when reflecting light.  In some lights, the MAC and Wet n Wild shades are similar, but what makes the MAC stand out is its ability to transform from your somewhat standard golden khaki, to a beautiful golden copper.  It's nothing like any other shade that I own, and I am so pleased with it.  If you were thinking that you would save and go for the Comfort Zone "dupe," don't - whilst I love my Comfort Zone palette, Sumptuous Olive is just perfect.

Have you been disappointed/relieved from any supposed dupes?  Does MAC or Wet n Wild get your vote?

Monday, 14 April 2014

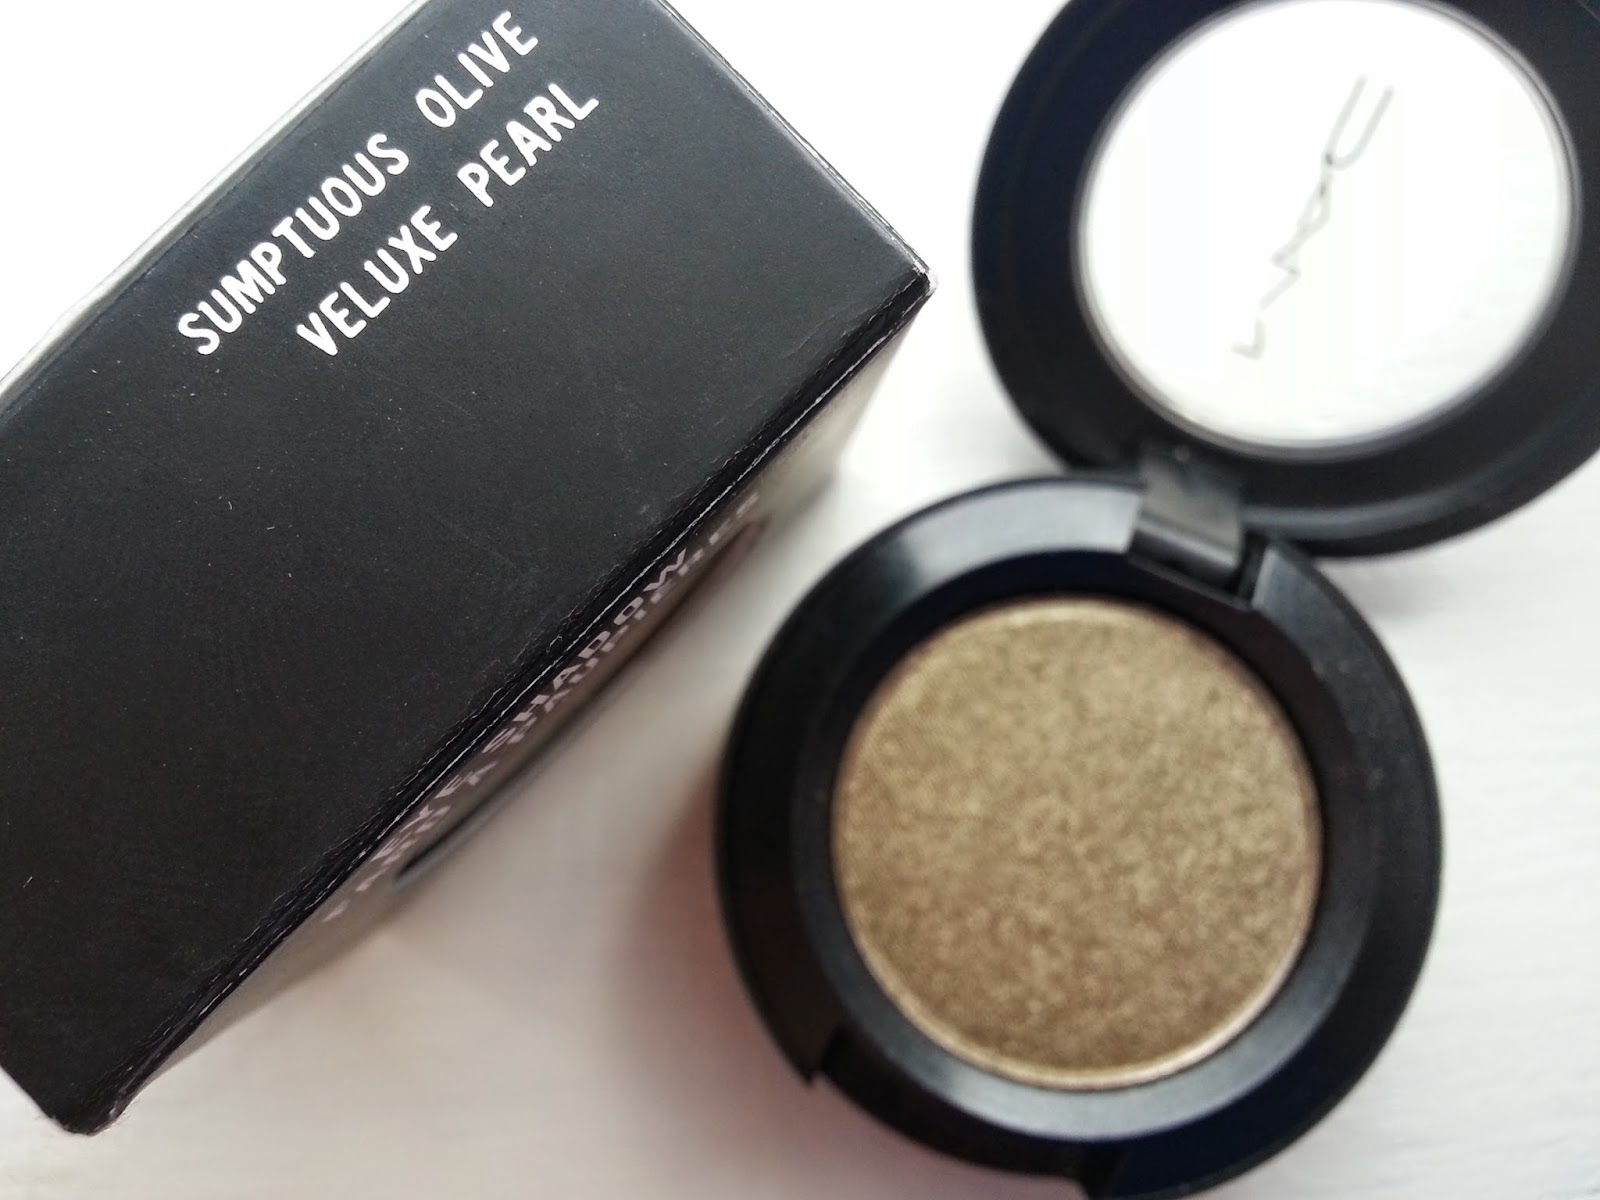
MAC Sumptuous Olive

This...this is my first ever MAC eyeshadow.  I won a giveway over on Katies' blog, SugarFixx Beauty, where I won a MAC eyeshadow and NARS blush of my choice!  I wanted an eyeshadow that wasn't the standard 'everyone has it' and thought I'd try something I might not normally go for.  So I chose Sumptuous Olive.


Sumptuous Olive is a Veluxe Pearl eyeshadow.  I had to do a bit of research into the finishes seeing as this is my first venture, but it seems Veluxe Pearl finishes are similar to Frost finishes, but are more metallic, with a pearly shimmer rather than a full on sparkly finish.


It is described as a golden khaki, which I completely agree with.  In the pan, it looks pretty standard as a khaki shade, but once applied the colours really shine through and it's like nothing I already own.  I was so pleased, because I did have a panic after choosing it that I had something similar, but you'll have to check back tomorrow to find out what that was!


Swatched heavily on my finger, the colour seems to be a lovely metallic green with a slight golden shimmer, matching what's in the pan perfectly.  Once it has all been blended out though, the khaki green fades a bit to reveal a gorgeous brown, almost copper, undertone which reflects the green in the light!  It's so, so pretty and I absolutely love it!  The below photographs show the eyeshadow at a light intensity, as I would most often wear it, but the pigmentation is great and can be easily built up to the intensity of the swatches on my hand.  I'd most likely up it to this amount of pigmentation on an evening out, and team it with a bit more of a smokey eye to make it multidimensional.  

In the day, I'd also probably take a nice brown in the crease, but I wanted to keep my swatches simple so you can see exactly what colour you'd be getting!


The only thing I was a little disappointed in was wear time; it's not really any longer lasting than any of my other eyeshadows.  It does crease a little throughout the day, but I find that it's pigmented enough to be easy to blend back out again if that does happen!  I will admit though I don't use primer on a daily basis; I really ought to start introducing  primer into my daily routine as I do wear eyeshadow quite a lot!

What do you think of Sumptuous Olive?  What's your favourite MAC eyeshadow?

Wednesday, 9 April 2014

Wet n Wild Color Icon Comfort Zone Palette

Way back in December, you might remember that I took part in a spending ban which resulted in a prize swap after we'd all finished!  Luckily, my swap was with Hannah from the USA and she sent me lots of gorgeous bits, all of which I love.  One of the things I've been using practically on a daily basis is the Wet n Wild Comfort Zone Palette.

Wet n Wild Comfort Zone Palette Review Swatches

Wet n Wild Comfort Zone Palette Review Swatches

The first photograph was taken way back now when I first got the palette inside in the evening with artificial light, and the ones underneath is the palette more recently taken with natural light; the shadows come in a plastic case with a flip up, clear plastic lid.  It's so difficult to get open when you first get it - America seal cosmetics like nothing I've seen before and it's a mission in itself to try and get in the thing!  It comes with a light dual ended brush, with a sparse brush on one side, and  a sponge applicator on the other.  I have used the brush actually - I find it really useful for blending my shades together, as it isn't as hard and sharp as other brushes I've had that come with palettes.  That said though, you've probably got a softer, fluffier brush which will do the job better.  I have also used the sponge applicator on its side to kind of stamp on the definer shade before blending.  I wouldn't rate the packaging or the additional brush, but it's what's inside that counts...

Wet n Wild Comfort Zone Palette Review Swatches

The left side is just beautiful, by far my favourite and is the side that I have worn the most.  The shades are really earthy, natural shades with four colours; one for highlight, over the lead, in the crease and a deep chocolate with fine copper flecks for the definer.  These shades are so wearable, and look gorgeous no matter which way you layer them.  I most often just grab the second shade for the eyelid, as it's perfect for a quick wash and go.  All of the shades have a shimmer to them, which is really nice and pretty.  But, it's not often that I wear all four of the shadows together because I think it's a very dramatic evening look due to the shimmer.  I'd love a day version of this palette with some matte shades in.

Wet n Wild Comfort Zone Palette Review Swatches

The right side is one I've barely reached for.  I really like the shades, particularly the iridescent definer which is a gorgeous shade that reflects purples and blues, with an almost reddy undertone.  It's so difficult to capture it in a photograph, but it really is so nice.  I really ought to branch out from my neutrals and start using this side more...

All of the shades are so pigmented, really soft and are easily blendable.  The quality is amazing for a product that costs so little!  I do get a bit of creasing towards the end of the day, but it's nothing horrendous and for the price, I really don't care.  UK ladies, don't be sad because you can find the Comfort Zone palette on Amazon for £10 including postage, which is so reasonable for the quality!  I would one hundred percent buy them again if these ever run out, and I think that Walking on Eggshells might have made its way onto my wishlist...

Have you tried anything from Wet n Wild?

Tuesday, 26 November 2013

Dear Santa...

Dear Santa

Carly here.  This year, I would love to see the Urban Decay Naked 3 palette under my tree.  Its rose gold hues have drawn me in and I need it to be mine.  I won't bore you with more details, because I'm sure every make up lover under the sun has told you all about it.  I swear I've been good this year, and nothing but nice. 

So please, Santa...I'd love a Naked 3 palette this year.

Thursday, 31 October 2013

Mystery Prize Package...from the USA!

As you all might know, I was taking part in a group spending ban.  You could all follow the groups progress using the #roseenospend.  Some girls were doing it for thirty days, like myself, and others are still doing a sixty day spending ban!  We were all paired up to spur each other on, and at the end of the swap, you got to send and receive a prize bundle from your partner!

I was paired with the lovely Hannah from Hannah's Beauty Blog and I received my prize box yesterday!  I photographed everything as soon as I opened it because I was dying to get in and try everything, and this whole unwritten blogger rule of no using it until it's been photographed was a killer.  Hannah is based in the USA, so I have been very lucky in the fact that I've been able to try some American beauty bits!  I'd love to tell you all what I popped in Hannah's box, but hers hasn't arrived yet!  Here is what was in mine...


First off, Hannah - thank you so much for sending me this!  I am so pleased with everything, and I love it all - I've tried almost all of it and everything is perfect!  The shades you've picked are gorgeous, and are ones that I'd have chosen myself - great minds must think alike!  I wish we had Wet n' Wild in the UK, and that candle....ohhhh it smells so good!


This is the Leaves candle from Bath and Body Works.  It smells absolutely gorgeous, and not remotely like leaves.  I can't remember what I thought it would smell like anymore, maybe crisp outdoors and maybe a bit of pine thrown in, but it's gorgeous spiced apple.  I love this so much that I've already tracked down a site that sells it in the UK so that I can get a larger version!


This blush is by Wet n Wild and is in the shade Heather Silk and Hannah has made the perfect choice!  She said she chose this as it's a perfect fall shade, and I have to agree!  I wore this today and it gives me that perfect flushed look.


Another Wet n Wild product that Hannah bought for me is this amazing eyeshadow palette.  I've seen a lot of reviews from other bloggers about these, and they're so distinctive with the embossed text for where to apply each colour.  I have the Comfort Zone palette and sometimes you have the odd shade in a palette that you might not touch but I can see me using every single one of these shades.  The left side is a perfect day look, and the right is a bit more dramatic!


EOS is another brand that I have heard of, so I was really excited to see this in my parcel!  I have the Pomegranate and Raspberry flavour and it is so nice, I love the packaging and they are so much better than I had expected them to be; far better than your standard lip balm.  I love this little sphere of goodness.  If anything it's made me want to try our UK equivalent, the Balmi to compare which formula is better!


Hannah also sent me a Covergirl Clump Crusher Mascara.  Covergirl is another brand that I have heard of, mainly when I've been watching America's Next Top Model as they usually win a contract to represent Covergirl!  First thoughts are that I love being able to see the brush in the packaging, most of the mascaras I've bought always come with the wand ready in the tube, so this was an interesting change!  I've tried this today and it has been so nice to wear!

I also got sent a little packet of Extras chewing gum in the flavour Raspberry Vanilla Cupcake.  I've actually not tried this yet, but it was such a nice little extra to get in the box!  I've never had a sweet flavoured gum before so this could be interesting!

I'll be reviewing each of these products a little more in depth in the future, so keep an eye out!  And thank you so much Hannah for everything!  I can see you put a lot of thought into the box, and I'm very grateful!  I really hope you like yours, please let me know what you think and keep in touch!

Have you done a beauty swap before?  Have you tried any of these products?